Machines get written off by the free-weight crowd, but for shoulders they’re some of the most useful tools in the gym. The shoulder is a fussy joint, and a guided path lets you load the delts hard without your stabilizers giving out before the muscle you’re actually trying to train.
Four machines cover almost everything I’d want to do for shoulders. The cable machine handles isolation work and keeps constant tension on the delts. The Smith machine is my pick for heavy shrugs. The dedicated shoulder press machine lets you press overhead and fail safely. Dip bars build pressing strength with nothing but your bodyweight.
New lifters can use these to groove the movement before loading a barbell. If you’ve been training a while and want more delt size, they still earn a spot in the rotation. Below I’ll cover what each one is good at, how to set it up, and the exact exercises I’d run on it.
Table of Contents
- 1 The 4 Most Effective Gym Machines for Shoulders
- 2 Benefits of Using Machines for Shoulders
- 3 Anatomy of the Shoulders
- 4 FAQs
- 5 Key Takeaways
- 6 Other Alternative Exercises
- 6.1 The 10 Best Pallof Press Alternatives
- 6.2 The 9 Best Leg Press Alternatives
- 6.3 The 10 Best Lying Leg Curl Alternatives
- 6.4 The 10 Best Dumbbell Pullover Alternatives
- 6.5 The 10 Best Bent Over Row Alternatives
- 6.6 The 10 Best Romanian Deadlift Alternatives
- 6.7 The 10 Best Box Jump Alternatives
- 6.8 The 10 Best Leg Extension Alternatives
- 6.9 The 10 Best Bench Press Alternatives
- 6.10 The 8 Best Hammer Curl Alternatives
- 6.11 The 10 Best Front Squat Alternatives
- 6.12 The 8 Best Incline Bench Press Alternatives
- 6.13 The 8 Best Ab Rollout Alternatives
- 6.14 The 8 Best Tricep Dip Alternatives
- 6.15 The 10 Best Overhead Press Alternatives
The 4 Most Effective Gym Machines for Shoulders
- Cable Machine
- Smith Machine
- Shoulder Press Machine
- Dip Bars
Cable Machine
Benefits of a cable machine
- Constant tension
- Safety
- Versatility
Constant tension
Time under tension is a big driver of muscle growth. According to studies, more time under tension leads to greater muscle protein synthesis, so keeping load on the muscle matters. This is where the cable machine beats free weights. A dumbbell lateral raise loses almost all its tension at the bottom, while the cable keeps the delts working through the entire range on exercises like lateral raises and face pulls.
Safety
The guided path means there’s less that can go wrong. You can set the height and resistance to match the exercise, and there’s no barbell to drop on yourself if a set goes south.
Versatility
The cable machine is the most versatile piece on this list. You can hit every part of the shoulder from just about any angle, which is why I’ve already put together a full guide to the best cable shoulder exercises.
Tips for using a cable machine
- Controlled movements
- Aim for stability
- Maintain proper posture
Controlled movements
Every cable shoulder exercise should be slow and controlled. Don’t jerk the weight or swing it up with momentum, or you’ll pull the load off the delts and put it somewhere you don’t want it.
Aim for stability
Keep your core braced and your feet planted. A stable base is what lets you move the weight under control.
Maintain proper posture
Keep your back straight and your shoulders down and back. Rounding forward shifts the work off the delts and onto your traps and neck.
Cable machine exercises for shoulders
- Lateral raises
- Face pulls
- Rear delt fly crossover
- Front cable raise
Lateral raises
Adjust the cables to the lowest height. Attach D handles, cross the cables in front of you, and grip them so they form an “X.” Stand with a slight bend in your knees and a straight back. Raise your arms out to the sides until they’re parallel to the floor, keeping a slight bend in the elbow, then lower them under control.
Focus on the delts doing the work, not momentum. I run these for 8-10 reps across 4-5 sets. No cable setup at your gym? There are plenty of lateral raise alternatives that hit the side delts just as well.
Here’s a video showing how to perform the cable lateral raise:

Face pulls
Face pulls are one of the best exercises to target rear deltoids, and they’re great for posture too. Set the cable to about eye level and use a rope attachment. Pull the rope toward your forehead while keeping your elbows high. I aim for 8-10 reps across 3-5 sets.
If you’d rather see it done first, have a look at how it’s performed in this video:

Rear delt fly crossover
Set the pulleys just above head height. Stand in the middle of the cable machine facing the pulleys, attach D handles, and cross the cables into an “X.” Extend your arms and pull the handles out and back, squeezing your shoulder blades together as you go. I do 3-4 sets of 10-12 reps. The rear delts respond well to this kind of direct work, the same as they do to other back isolation exercises.
Here’s Olympia-level athlete Hunter Labrada performing this exercise:

Front cable raise
Face away from the machine and hold the cable in one hand. Keep your arm straight, raise it in front of you to shoulder height, then lower it back down. I do 8-10 reps for 3-5 sets to hit the front delts.
The front cable raise looks simple, but small details make a big difference in how much you get out of it. Here’s how it’s done:

Smith Machine
Benefits of a Smith Machine
- Safety
- Even building
Safety
The built-in safety catches mean you can’t drop the bar on yourself, which makes the Smith machine safer than a free barbell for loaded shrugs.
Even building
Because the bar moves on a fixed path, the Smith machine is a useful tool for evening out a side-to-side imbalance. Both sides have to do their share of the work.
Tips for using a Smith Machine
- Proper bar height
- Correct stance
- Grip width
Proper bar height
Before you load any plates, set the bar to a height you can reach easily. Just above knee height usually works well.
Correct stance
Stand with your feet about shoulder-width apart for a stable base. Keep your back straight and your core braced.
Grip width
Grip the bar a little wider than your shoulders. That keeps the load on your traps where you want it during shrugs.
Steps to using a Smith Machine for shrugs
- Position the bar at mid-thigh level and load the desired weight. Stand with your feet shoulder-width apart, facing the bar.
- Grasp the bar with an overhand grip, hands slightly wider than your shoulders.
- Unlock the bar and lift it off the rack, keeping your arms straight.
- Keep your arms straight and lift your shoulders toward your ears in a shrugging motion. Focus on using your traps and not your arms.
- Slowly lower your shoulders back to the starting position.
- Perform the desired number of reps at a controlled pace with steady breathing.
- After your set, re-rack the bar securely on the frame.
Smith machine shrugs are easy to get wrong, so here’s a video that walks through doing them right:

Shoulder Press Machine
Benefits of a shoulder press machine
- Isolation of shoulder muscles
- Less risky
- Stable and controlled motion
- Posture support
- Easily adjustable resistance
Isolation of shoulder muscles
The seated shoulder press machine isolates the delts better than most free-weight pressing. Studies show isolation and compound work are both effective, but isolation is the better tool when you want to target a muscle directly or fix an imbalance.
Less risky
Compared to a standing barbell press or a push press, the machine is far lower risk. The fixed path lets you fail safely, so you can push close to your limit without a spotter.
Stable and controlled motion
Stability is a big part of pressing well. The machine keeps your body in a mostly fixed position, so you can put your energy into driving the weight up instead of balancing it.
Posture support
The seat and backrest keep you in a good position the whole set, which takes much of the injury risk out of overhead pressing.
Easily adjustable resistance
Changing the weight is as simple as moving a pin. That makes progressive overload easy, and it helps when you and a training partner aren’t pressing the same numbers.
Tips for using a shoulder press machine
- Elbow positioning
- Adjust the seat
- Control the negative
Elbow positioning
Keep a slight bend in your elbows at the start and end of each rep. It keeps tension on the delts and saves your joints from strain.
Adjust the seat
Set the seat so the handles sit level with or just above your shoulders at the start of the movement. Press from there.
Control the negative
Shoulders are stubborn to grow because we use them so much. Lower the weight slowly on every rep so the delts stay under tension as long as possible.
Steps to performing the machine shoulder press
- Sit on the machine and adjust the seat so the handles line up with your shoulders. Keep your back flat against the seat back.
- Grasp the handles with a grip that’s comfortable.
- Push the handles up in a smooth motion, extending your arms. Keep a slight bend in your elbows at the top so they don’t lock out.
- Slowly bring the handles back down to the starting position, keeping your elbows bent throughout.
- Exhale as you press up and inhale as you return to the start.
- Perform the desired number of reps and sets, picking an amount that lets you hold your pace and form.
Here’s a video on how to perform the machine shoulder press:

Dip Bars
Benefits of dip bars
- Upper body strength
- Core engagement
Upper body strength
Dips hit your shoulders, triceps, and chest at the same time, so they’re one of the best bodyweight builders for upper-body pressing strength.
Core engagement
Holding yourself up on the bars forces your core to work too, which helps your stability and posture.
Tips for using dip bars
- Proper form
- Get a stepping platform
- Watching your breathing
Proper form
Keep your elbows close to your body to keep the work on your triceps and front delts.
Get a stepping platform
If you’re on the shorter side, a step platform makes it easier to get on and off the dip bars.
Watching your breathing
Breathe in as you lower your body and out as you push yourself back up.
Steps to using dip bars
- Step up to the dip bars and grip them firmly, arms straight down and shoulders above your hands.
- Lift your body off the ground, keeping your legs straight or slightly bent. Cross your ankles for stability if you need to.
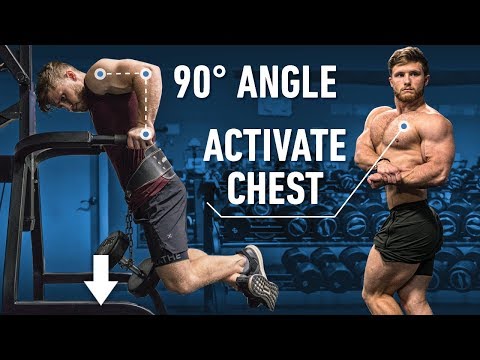
- Lower your body slowly by bending your elbows. Keep them pointed backward and tucked in close. Continue until your arms reach at least a 90-degree bend.
- Push through your palms to lift your body back to the start. Straighten your arms but don’t lock out your elbows.
- Repeat for the desired number of reps.
Still not sure how to do a dip? This video covers the common mistakes and how to build your shoulders and chest:
Benefits of Using Machines for Shoulders
Ease of use for beginners
Because machines move on a fixed path, they’re easy to learn. If you’re new to training shoulders, they let you focus on the muscle without worrying about balancing the weight.
Focused muscle activation
Machines let you zero in on one muscle at a time. That’s handy for shoulders, where hitting the delt you’re after matters more than moving the most weight.
Enhanced safety
Machines cut down the risk of bad form and dropped weights compared to free weights. That counts for a lot with shoulders, since you often have to train them hard to make them grow.
Lower impact on joints
Machines tend to be easier on the joints. Your stabilizers and connective tissue take less of a beating than they do under a free barbell.
Customizable workouts
Some machines, like the cable setup, give you a long list of shoulder exercises to choose from. That lets you target the delts from angles a barbell can’t reach.
Anatomy of the Shoulders
Your shoulder is a ball-and-socket joint, which is what gives it such a huge range of motion. That same freedom makes it easy to hurt, so it pays to know the muscles involved before you load them up.
Deltoid
The deltoid is the muscle most people picture when they think shoulders. It’s split into three heads, the anterior (front), lateral (side), and posterior (rear), and each one handles a different arm movement. Hitting all three is what builds a round, full-looking shoulder.
Rotator cuff
The deltoid is the star, but the rotator cuff is the unsung hero of the group. It’s four smaller muscles, the supraspinatus, infraspinatus, teres minor, and subscapularis, and together they keep the joint stable and help with arm rotation.
Related: Cable exercises for the rotator cuff
Trapezius
The traps run from your neck down to your mid-back. They move, rotate, and stabilize your shoulder blades and help extend your neck, which is why shrugs hit them so directly.
FAQs
Based on a study from PubMed, training shoulders effectively can be achieved with just one hour per week. This can be split into different sessions, like 3 x 20 minutes or 9 x 7 minutes, which shows how flexible you can make your workout schedule. The key is consistent, focused strength training. So, aim for well-distributed shoulder workouts every week.
Lifting heavy is a very contentious topic and most evidence is anecdotal. Although heavy weights can build strength and size. It’s important to balance this with the risk of injury, especially because of how complex the shoulder muscles are. A mix of heavy and lighter weights, focusing on form and muscle engagement, is often recommended.
If you’re unsure, just listen to your body and adjust your workout intensity as needed. After all, everyone is different and there are plenty of different ways to build broader shoulders.
Generally, training your shoulders every day isn’t recommended because of the risk of “overtraining” and potential injury. Shoulders are a meaningful upper body muscle and require ample time to recover and grow. Again, everyone is different but exceeding your genetic capacity could lead to muscle fatigue and strain which could hinder your progress.
Try to work in different movements that target different parts of the shoulder to get balanced and well-rounded shoulder development.
The most effective exercise for shoulders mainly depends on individual goals and physical condition. However, research has shown that exercises like overhead presses and lateral raises are often cited for their effectiveness in targeting the delts.
Based on anecdotal evidence for shoulder growth, the recommended training volume is about 8-12 sets per week for each deltoid head (side and rear) and 6-8 sets for the front delts. You can achieve this through 2-3 sessions per week. Always try to strike the balance between volume and recovery.
Key Takeaways
Match the machine to what you’re chasing. If you want bigger side and rear delts, the cable machine is the one to live on. The constant tension on lateral raises and face pulls is hard to beat, and you can hit every head from some angle. For pressing and delt size, use the shoulder press machine. It loads the front and side delts heavy and lets you push to failure safely. The Smith machine is there when you want to load shrugs for your traps without balancing a free bar, and dip bars are the pick when you’ve got no machines around and want to build pressing strength with bodyweight. You don’t need all four in one session. Pair the cable machine with one pressing option and you’ve got the whole shoulder covered.
Other Alternative Exercises
If you enjoyed this post, check out our other roundups of the best alternatives for other exercises.