It may not seem like it, but the “simple” bench press is one of the most technical lifts there is.
Before you ever even unrack the bar, you’ve got no fewer than four cues to check off as part of your initial setup—hips open, balls of the feet screwed into the floor, scapula tucked, back arched slightly to engage the lats and triceps better.
That’s only for starters. You’ve still got to fit your upper body into this high-stakes body puzzle. Once you’ve got your hand placement squared away and the weight balanced precariously over your midline, the real battle begins.
There’s no magic bullet for perfecting your bench press form, sadly. That only comes with hours and hours under the bar. That said, the suicide grip is about as close as it gets.
Yet, there’s a catch: perform it carelessly, and you could find yourself in a world of hurt.
In fact, we don’t even recommend you use it and we’ll explain why.
Table of Contents
What is the Suicide Grip?
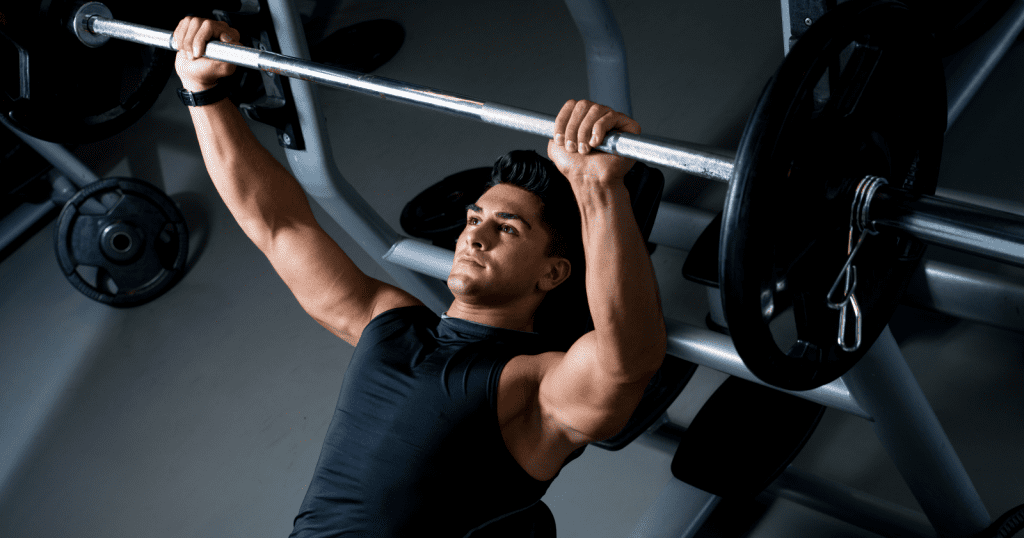
The suicide grip is a barbell grip technique where the thumb sits on the same side of the bar as the other fingers. It is most commonly known for its use in the bench press and is also known as a thumbless grip or false grip.
The thumbs are the keys to the suicide grip. Whereas with a conventional grip, the thumbs are curled around the lower edge of the bar for greater security, the suicide grip calls for them to be unwrapped entirely so that they rest beside the index fingers.
In other words, the hands remain open rather than closing around the bar (hence the “thumbless” and “false” grip labels). With the thumbs out of the way, the bar shifts ever-so-slightly lower down on the palms, instantly placing it, the forearms, and the elbows into a near-optimal “stacked” alignment.
Here’s an example a fitness model using the suicide grip.
As mentioned, though, this technique comes with a Lee Haney-sized caveat: using the suicide grip places the lifter at significantly greater risk of accidentally dropping the loaded bar on their face, neck, and chest.
For a classic example of why the suicide grip is risky, watch the video below. Warning: the guy drops the barbell on his neck. If you don’t want to see it, skip it.

No thumbs mean no safety barrier between your palms and the heels of your hands. During pressing movements, that means no protection against the arm-length death drop between your hands and your chest (the best-case scenario) or head (a nightmare even to conceive).
The increased danger of the bar rocking or slipping off the hands is where the “suicide” part of the name comes from—sweating yet?
Suicide Grip Advantages
The thumbless grip offers a couple of significant advantages over a regular grip, at least for select lifts and lifters. Chief among these advantages is superior alignment.
Alignment
Since the suicide grip permits the bar to sit a little lower down on the palms, it keeps the weight poised directly over the wrist joint. This weight, in turn, increases comfort by reducing wrist strain.
Effortless alignment of the lower arm is no small selling point, especially considering how many lifters have trouble maintaining a neutral wrist position during movements like the bench press and overhead press.
Stacked wrists are a postural reinforcement that affects the wrist itself and the angle of the forearms, the resulting deviation of the elbows, and the amount of adverse emphasis on the shoulders.
Tucked Elbows
The other noteworthy perk of the suicide grip—particularly in regards to the bench press—is that it forces you to keep your elbows tucked throughout the entire movement. When your elbows are cinched in closer to your body, you’re able to recruit more triceps. This slight alteration may help you lift more if you’re naturally tricep dominant the way many lifters are.
Alleviates Stress
Another positive side-effect of proper tucking is that it alleviates stress on the shoulder joints, preventing them from lapsing into internal rotation. Over the long term, lifting with the excess internal process could lead to impingement, chronic pain, or other serious issues that might threaten to put you out of commission temporarily.
I don’t need to explain to you what a big deal this is if you’ve ever had to deal with sore, achy shoulders for days following a heavy bench session.
Shoulder and wrist pain are two common complaints among lifters who do a lot of benching. If you’ve been looking for a way to ease the burden on either (or both) of these crucial joints, the suicide grip may ironically breathe new life into your presses.
Suicide Grip Disadvantages
The most obvious downside of the suicide grip is the dramatically elevated risk of injury to life and limb it creates.
Possible Injury
Let’s not beat around the bush: the suicide grip is extremely dangerous, especially when you’re moving hundreds of pounds of weight. That danger is no less real for elite-level strength athletes and experienced lifters than it is for weight-room novices.
There are myriad ways that the thumbless grip can prove dangerous, some of which are less predictable than others.
Here’s just one example: when your alignment is on-point, you’re able to channel force into the bar more effectively. When you’re able to conduct power into the bar more effectively, it tends to move faster. When the bar is moving faster with no thumb support… well, use your imagination.
Bend the Bar
Potential for crippling injury aside, switching to a suicide setup could end up working against you in the bench press if you’ve historically gotten good results from following the “bend the bar” cue.
Coaches often instruct lifters to “bend the bar” while benching as a way of getting them to activate the lats without too much conscious effort.
Seeing as how it’s impossible to produce the subtle yet significant pulling action essential for this cue without the thumbs in place, it also becomes tougher to tighten that all-important upper back musculature.
Prohibited
Lastly, the suicide grip is strictly prohibited in powerlifting competitions. If you’re a powerlifter and you opt to train with a thumbless grip more often than not, the chances are good that most of the benefits you accrue in training will be nullified when it matters most.
Tips for Maximizing Safety With the Suicide Grip
There’s no way to take 100% of the risk out of the suicide grip, but there are things you can do to make it marginally less menacing. Don’t give your thumbs the slip without first implementing these vital safety measures:
- Get a spotter. Now is not the time to let pride overrule reason. Flag down a good samaritan (ideally someone equally strong or stronger) to give you a hand with your lift-off and re-rack, and have them stick around as you complete your set.
- Use chalk if you have some available. Chalking up will increase your traction on the bar, eliminating potentially ruinous variables like sweat and slippage. The owners of your gym may not like it, but it’s a lot better than the alternative for everyone involved.
- Keep the bar as close to the center of your palm as possible. Don’t try to choke up on it just for the sake of stacking your wrists. The desired alignment change will take care of itself when you retract your thumbs.
- Squeeze the bar firmly with all eight fingers plus the tips of your thumbs. Just because your thumbs are taking a backseat doesn’t mean they’re off-duty. You should still be actively gripping the bar from lift-off to re-rack.
- Keep your sets short. Limit your sets to around 5-8 reps—10 at the absolute most. False grip and form breakdown can be a disastrous mix. Plus, there’s not much point in utilizing it for higher-rep sets since the whole idea is to increase your maximal load.
When to Use the Suicide Grip
The next time you’re at the gym, feel free to experiment with using a false grip for a variety of low-risk lifts. You may find that going thumbless improves your performance on exercises like:
- Back squats (unwrapping your thumbs and placing the bar lower on your palms can give your shoulders a much-needed break during extended sets)
- Pull-ups (you might be surprised how much of a difference getting your thumbs over the bar can make)
- Lateral pull-downs
- Cable rows
- Pectoral deck/cable flies
When NOT to Use the Suicide Grip
I’m a staunch believer that there’s a time and place for all techniques.
That said, you might want to think twice before busting out the suicide grip for lifts that put you at risk of dropping the bar on your head, face, neck, or chest, such as:
- Bench presses (including the dumbbell variety)
- Close-grip bench presses
- Overhead presses
- Dumbbell shoulder presses
- Military presses
Conclusion
The suicide grip is one of lifting’s forbidden fruits, offering the enticing promises of more weight, less joint pain, and superior movement mechanics.
However, the technique didn’t get its nickname for no reason. At best, it’s a modestly helpful tweak that may put your body in a more advantageous position when you’re throwing around considerable weight. At worst, it’s an ER visit waiting to happen.
If you’re considering trying out the thumbless grip for yourself, start with light loads and be sure to choose exercises that keep the inherent threat level low. Otherwise, you may end up crushing something other than a previous PR.