The core, also known as the abdominals, is one of the most overlooked muscle groups when it comes to resistance training. The core plays a huge role in stability, movement, performance, and injury prevention. Just because you have a six-pack, that doesn’t necessarily mean that your core is strong.
There are several muscles that make up the core, and each is responsible for a specific action. For example, the rectus abdominis is what most people refer to as the abs because it’s the most superficial, and its primary action is flexion of the torso.
One of the major core muscles that most people forget about is the transverse abdominis, a key stabilizer muscle that’s located underneath the rectus abdominis. The most popular exercise for strengthening the abdominal muscles, specifically the transverse abdominis, is the plank (related: plank muscles worked).
Although planks are effective and offer many benefits, depending on your goal, situation, physical abilities, and equipment selection, there may be superior exercise alternatives.
To keep things simple, we’ve compiled a list of the 10 best plank alternatives so you can spend less time doing the ones that don’t work and more time making progress!
Keep reading to find out why each exercise is included and how to perform them correctly.
Table of Contents
- 1 The 10 Best Plank Alternatives
- 2 Dead Bug
- 3 Bird Dog
- 4 Crunches
- 5 Reverse crunches
- 6 Decline Sit-Ups
- 7 Ab Roll-Outs
- 8 Side Plank
- 9 Cable Crunches
- 10 Leg Raises
- 11 Cable Wood-Chop
- 12 Reasons to choose a plank alternative
- 13 Muscles worked by the plank
- 14 Frequently Asked Questions
- 15 Key Takeaways
- 16 Other Alternative Exercises
- 16.1 The 8 Best Incline Bench Press Alternative
- 16.2 The 10 Best Front Squat Alternatives
- 16.3 The 10 Best Hack Squat Alternatives
- 16.4 The 8 Best Tricep Dip Alternatives
- 16.5 The 8 Best Ab Rollout Alternatives
- 16.6 The 10 Best Bench Press Alternatives
- 16.7 The 10 Best Leg Extension Alternatives
- 16.8 The 9 Best T-Bar Row Alternatives
- 16.9 The 10 Best Box Jump Alternatives
- 16.10 The 10 Best Dumbbell Pullover Alternatives
- 16.11 The 10 Best Lat Pulldown Alternatives
- 16.12 The 10 Best Pallof Press Alternatives
- 16.13 The 10 Best Glute Bridge Alternatives
- 16.14 The 9 Best Barbell Row Alternatives
- 16.15 The 9 Best Lunge Alternatives
The 10 Best Plank Alternatives
- Dead Bug
- Bird Dog
- Crunches
- Reverse Crunches
- Decline Sit-Ups
- Ab Roll-Outs
- Side Plank
- Cable Rope Crunches
- Leg Raises
- Cable Wood-Chop
Dead Bug
When to perform the dead bug
The dead bug is an excellent plank alternative for those that have a lower back injury or pain which prevents them from performing a plank correctly. The dead bug targets the same muscle as a plank; however, since you’re lying supine on the floor, it takes the strain off of your lower back.
If you aren’t strong enough to do a plank yet, a dead bug is also a good starting point. Unlike other ab exercises, the dead bug primarily targets the deeper core muscles, including the transverse abdominis, pelvic floor, and erectors. Another benefit of this exercise is that there’s no equipment required.
Consistently performing dead bugs helps strengthen your core, which will have good carry-over to numerous other exercises and activities of daily life. Your core is involved in nearly every exercise and/or movement you perform, so developing a strong core is extremely beneficial regardless of your goal.
The dead bug isn’t a very taxing exercise, so you can perform it 2-3 times per week at any point during a training session. The key to getting the most out of dead bugs is to not rush through the exercise, focus on your breathing, and make sure your form is correct.
How to perform the dead bug
- Place a mat on the floor and lie on your back with your knees bent and feet flat on the floor. Your arms should be resting at your sides.
- While keeping your lower back, head, and shoulder pressed against the ground, lift your arms until they are perpendicular to the floor.
- Bend your knees to a 90-degree angle and raise your legs until your knees are directly above your hips.
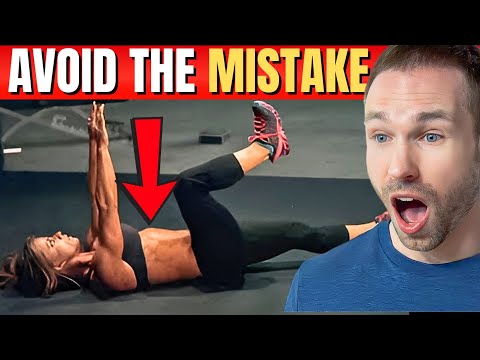
- Take a deep breath, brace your core, then exhale as you lower your right leg and left arm until they are just above the floor. Your left leg and right arm should remain stable.
- Pause for 1-2 seconds, then inhale as you bring your right leg and left arm back to the starting position.
- Repeat on the opposite side (right arm and left leg).
- Continue this process for the desired number of sets and repetitions.
Check out the video below from Squat University to see how to perform the dead bug exercise correctly!
Dead Bug Tips
- Maintain proper form by keeping your lower back pressed against the floor throughout the entire movement by engaging your core.
- If your body weight is too easy, hook a resistance band to your foot and grab the other end with the opposite hand to increase the difficulty.
- If the exercise is too strenuous, start by lowering one arm or one leg at a time, then progress from there.
Bird Dog
When to perform a bird dog
The bird dog exercise combines a traditional plank and a dead bug. Unlike the dead bug, you are on all fours during the bird dog. And unlike a plank where you’re isometrically holding a certain position for a given period of time, you are purposefully moving your arms and legs.
Not to mention, the bird dog is considered to be a full-body exercise; however, it’s especially great for targeting your core. Similar to the plank and dead bug, the bird dog primarily engages the deeper core muscles, including the transverse abdominis.
Compared to the dead bug, the bird dog works the lower back muscles slightly more, but there’s less strain placed on the spine, so it’s great for those recovering from a lower back injury. The bird dog is a fantastic exercise to do anytime, and since it doesn’t require any equipment, you can even do it at home or on the road!
How to perform a bird dog
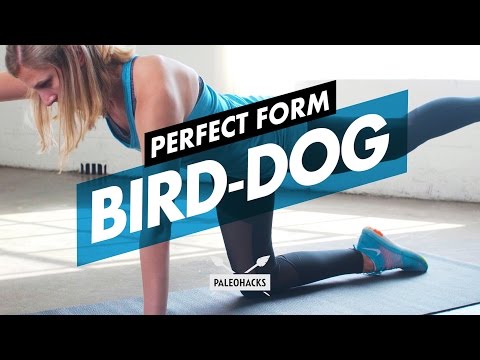
- Place a mat on the floor, then get on all fours into a tabletop position.
- Evenly disperse your body weight across your hands and knees. Your knees should be approximately hip-width apart, and your hands should be approximately shoulder width apart.
- Look straight down to maintain a neutral spine. Take a deep breath, brace your core, and begin to raise and extend your right arm and left leg.
- Focus on forming a straight line with your right hand and left foot while keeping your hips square.
- Once your right arm and left leg are fully extended and parallel with the floor, hold for 1-2 seconds.
- Exhale as you lower your right arm and left leg back to the starting position.
- Repeat this process with your left arm and right leg to complete the repetition.
- Continue for the desired number of repetitions and sets.
For an exercise demonstration of the bird dog, watch the video below!
Bird dog tips
- Brace your core to maintain proper positioning as you move your arms and legs.
- Avoid letting your lower back arch by contracting your core and looking straight down.
- Once the bird dog becomes too easy, you can perform this exercise in a high plank position to increase difficulty.
Crunches
When to perform crunches
Crunches are a great plank alternative for those that want to strengthen the core and target the rectus abdominis, most commonly referred to as the abs or “six-pack.” The rectus abdominis is the most superficial muscle of the core, so when it’s well-developed and you have a low enough body fat percentage, it really stands out.
The rectus abdominis is mainly responsible for flexion of the torso, which is why crunches, sit-ups, and leg raises are the most common exercises for the abs. If you’re a physique competitor, a strong core is still important, but the judges don’t really care about that. They do care about how chiseled and defined your midsection is. Therefore, crunches may be the best plank alternative you can do.
If the traditional bodyweight crunch is too easy, try adding weight by holding a plate or using a cable. Some gyms even have machines designed to build your midsection. When done properly, crunches are one of the most effective ab exercises. Since they aren’t very strenuous, you can perform them multiple times per week, usually at the end of a workout.
How to perform crunches
- Place a mat on the floor underneath you.
- Lay on your back with your knees bent and feet flat on the floor.
- Bend your arms and place your hands behind your head.
- Take a deep breath, expand your ribcage, and then exhale as you crunch your abs to lift your head and upper back off the floor.
- Once you feel a strong contraction in your upper abs, hold for 1-2 seconds.
- Inhale as you slowly lower your head and upper back down to the floor.
- Repeat for the desired number of repetitions and sets.
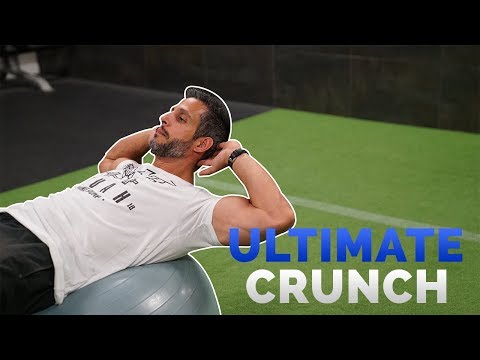
In the video below, Sal DiStefano from Mind Pump TV shows you how to do the perfect crunch to build your core!
Crunch tips
- Do not pull on your head and neck as you crunch. The movement should be solely performed by the abs.
- Breathe out as you contract your abs.
- Add resistance if your body weight alone is too easy.
- You can also perform crunches on an exercise ball.
Reverse crunches
When to perform reverse crunches
Reverse crunches are an excellent plank alternative for building and developing the lower portion of the rectus abdominis. Traditional crunches are better for targeting the upper and middle portion of the abs, so doing both crunch variations is a good idea. It’s quite common for people to store excess body fat on the lower abs.
Although you can’t spot reduce, the more muscle you have, the more your abs will show, even at a higher body fat percentage. What’s more, the lower abs are extremely important for core strength and stability. Doing exercises that involve bringing your pelvis closer to your sternum is the best way to target your lower abs.
Reverse crunches are great for beginners, intermediates, and those with access to a limited amount of equipment. If reverse crunches become too easy, you can add resistance via ankle weights, but you may want to consider doing leg raises instead, which we will cover later on!
Since reverse crunches aren’t very taxing on the body, you can do them multiple times per week, usually near the end of a workout.
How to perform reverse crunches
- Place a mat on the floor.
- Lay down on your back, bend your knees and place your feet flat on the floor. Place your arms along your sides.
- Take a deep breath, brace your core, and make sure your lower back is flat against the floor.
- Exhale as you raise your feet off the ground, bring your knees up towards your torso, and rotate your hips backward. Keep your knees bent to a 90-degree angle throughout the movement.
- Once you feel a strong contraction in your lower abs, slowly lower your legs until your feet barely touch the floor.
- Repeat for the desired number of repetitions and sets.
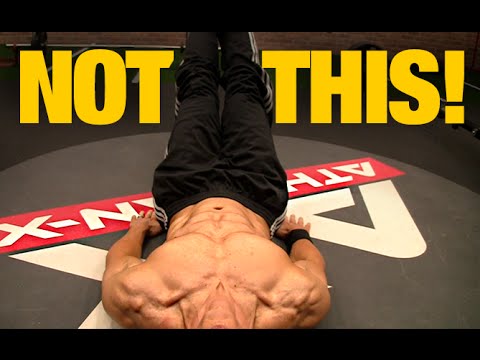
In the video below, Jeff from Athlean-X demonstrates how to do a reverse crunch the right way!
Reverse crunch tips
- To fully engage the core, focus on rotating your pelvis backward.
- Avoid rounding your lower back.
- Don’t use momentum to lift your legs.
Decline Sit-Ups
When to perform decline sit-ups
Decline sit-ups are another ab exercise that primarily targets the ab muscles, including the rectus abdominis. Unlike the crunch and reverse crunch, the decline sit-up is slightly more challenging and engages the entire rectus abdominis as opposed to just the upper or lower portion.
When performed correctly, the decline sit-up can improve core strength and stability, as well as add definition to your abs. Whether you’re a physique competitor, Crossfitter, powerlifter, strongman, Olympic weightlifter, or average joe, the decline sit-up has huge carry-over to other exercises and activities of daily life.
What’s great about the decline sit-up is that you can make it harder or easier by simply adjusting the decline. You can also hold a weight to add resistance. The decline sit-up is fairly easy to learn, so it can be utilized by beginners, intermediate, and advanced trainees.
The decline sit-up is a bit more taxing than a crunch, so we recommend doing it 1-3 times per week. You can do it at the end of a workout, but if ab development is a priority, you may want to consider performing them near the beginning.
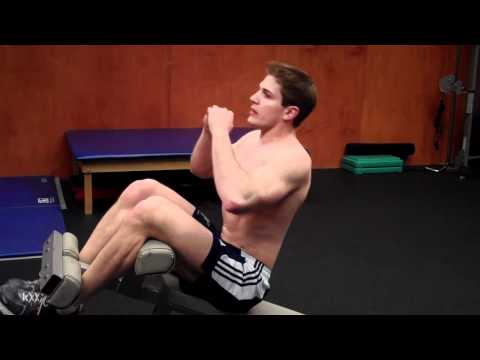
How to perform decline sit-ups
- To do this exercise, you will need a decline bench (preferably adjustable).
- Adjust the decline bench to an appropriate angle depending on your experience level.
- Sit down on the bench, hook your feet under the support pads, and lay back.
- Take a deep breath, brace your core, and put your hands behind your head or cross your arms in front of your body. Make sure your lower back is flat against the bench and look straight ahead.
- Exhale as you lift your torso up towards your legs. Focus on curling your body as opposed to bending at the waist.
- At the top of the rep, crunch down by contracting your abs and hold for 1-2 seconds.
- Slowly lower yourself back down until your shoulder blades touch the bench.
- Repeat for the desired number of repetitions and sets.
To see how to perform a decline sit-up with good form, watch the video below from Scott Herman Fitness!
Decline sit-up tips
- If you put your hands behind your head, avoid pulling on your head/neck. This variation is a bit more challenging than crossing your arms in front of your body.
- Hold a plate, kettlebell, dumbbell, or medicine ball to add resistance.
- Focus on curling your body to minimize hip flexor engagement.
Ab Roll-Outs
When to perform ab roll-outs
Ab rollouts are a suitable plank alternative for those with more experience and looking for a challenging exercise. Ab rollouts train the entire core, including the rectus abdominis, transverse abdominis, obliques, and lower back muscles. Unlike other core exercises, the ab rollout primarily strengthens the core through anti-extension.
As we’ve discussed already, the most popular ab exercises involve torso flexion. The anti-extension component of the ab rollout is very beneficial for improving core strength and stability, especially since other core exercises don’t involve that.
Since the core plays such a big role in protecting and stabilizing the spine as you perform various movements, doing ab rollouts has a huge carryover to several sports, activities of daily life, and other exercises. As you do this exercise, it’s important to avoid arching the lower back and maintain a neutral spine.
If you don’t have access to an ab wheel, you can still do this exercise with a barbell and plates. The difficulty of ab rollouts can be modified to make them easier or more challenging. This is a quite fatiguing exercise, so we recommend doing it 1-2 times per week near the end of a workout, so your core isn’t tired when performing other movements.
How to perform ab roll-outs
- To do this exercise, you will need an ab roller and mat.
- Place the mat and ab roller on the floor.
- Kneel down on the mat, extend your arms, and grab the ab roller with a pronated grip.
- Start with your torso leaning forward at a 70-degree angle with the roller on the floor.
- Take a deep breath, brace your core, then begin to push the ab roller away from you while maintaining a neutral spine.
- Keep going forward until you are nearly parallel with the floor, then pause for 1-2 seconds.
- Use your core to pull yourself back to the starting position as you exhale.
- Repeat for the desired number of repetitions and sets.
Ab rollouts are commonly done incorrectly, so make sure to watch the video below from Athlean-X to make sure you’re doing them right!
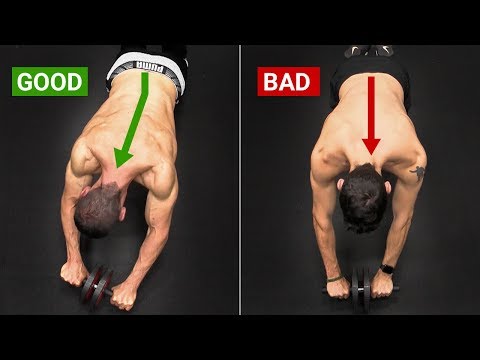
Ab roll-out tips
- Start rolling the wheel outward by flexing your shoulders.
- Squeeze your glutes and brace your core to maintain a neutral spine throughout the movement.
- Go as far forward as you comfortably can without breaking your form. This will be different for everyone depending on their biomechanics and strength.
Side Plank
When to perform a side plank
The side plank is a good plank alternative for those that want to build and strengthen their obliques, quadratus lumborum, and glutes. These muscles work in conjunction with the rest of the core to stabilize the spine. The obliques are often forgotten about when developing an exercise routine; however, they are crucial for rotation, lateral flexion, and core stabilization.
If you’re an athlete, strong obliques are very advantageous because, depending on your sport, you may be subject to a lot of rotational movements. The obliques are not very active when doing more core exercises, so targeting them directly by performing a side plank is a great idea.
Side planks don’t require any special equipment, and they can be easily manipulated to make them more or less challenging. If you’ve never done a side plank, start slow and work your way up after you’ve mastered the form.
Since the side plank places even less stress on the lower back than a traditional plank and isn’t very taxing, you can perform them multiple times per week at any point during a workout.
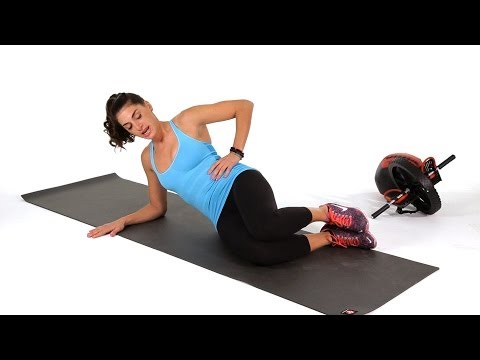
How to perform a side plank
- Place a mat on the floor.
- Lie on your left side with your legs extended and stacked on top of one another.
- Position your left elbow under your left shoulder with your forearm pointing away from you.
- Look straight ahead, take a deep breath, brace your core, squeeze your glutes, and lift your hips off the ground. Your weight should be supported by your left arm and the side of your left foot.
- Your body should be in a straight line the entire time. Hold this position for 15-60 seconds, depending on your skill level.
- Slowly lower your hips back to the ground, then switch sides and repeat. Perform the same amount of time on each side.
Check out the video below for a short exercise demonstration of the side plank!
Side plank tips
- Side planks correct strength imbalances since you work one side at a time. Start with your weaker side and perform the same amount of time on the stronger side.
- If you can’t perform a normal side plank, try going on your knees and work your way up from there.
- Avoid letting your hips sink, or body rotate as you perform the movement.
Cable Crunches
When to perform cable crunches
Cable crunches are a more advanced exercise that’s used to build and strengthen the rectus abdominis. If body weight crunches are getting too easy for you, adding resistance via a cable is a great way to continue applying progressive overload.
The best part about using cables as opposed to machines and/or free weights is that you can easily adjust the path of motion to fit your body, and it applies constant tension to whatever muscle you’re working. Out of all the ab exercises you can do, the cable crunch is by far one of the best, especially for hypertrophy.
Cable crunches can be performed standing or kneeling, either one with work, so try both to see which one feels best! Cable crunches allow you to achieve a bigger range of motion than floor crunches because you can really stretch your abs at the top of the movement.
Cable crunches are typically performed 2-3 times per week at the end of a workout. Since they don’t target the obliques or lower abs very well, we recommend doing some other core exercises along with it.
How to perform cable crunches
- Adjust a cable pulley to the highest settings, select an appropriate amount of weight and attach a rope to it.
- Place a mat on the floor.
- Stand facing the cable and grab the rope with a neutral grip.
- Kneel on the floor with your torso slightly leaning forward. Hold the rope to the top of your head.
- Take a deep breath, slightly arch your upper back to stretch your abs, then exhale as you crunch down. Focus on bringing your elbows to your knees or upper thighs. Keep your hips up by squeezing your glutes.
- Once you feel a strong contraction in your abs, pause for 1-2 seconds.
- Slowly return to the starting position by extending your torso.
- Repeat for the desired number of repetitions and sets.
Cable crunches are a bit tricky to perform correctly, so check out the video below from Colossus Fitness for some exercise form tips!

Cable crunch tips
- If you perform this exercise standing, face away from the cable stack.
- Keep your hips locked into position throughout the movement.
- Don’t pull the cable down with your arms; the rope should remain in one spot the entire time. Allow your core to execute the movement.
Leg Raises
When to perform leg raises
Leg raises are a more advanced version of the reverse crunch. They directly target the lower portion of the rectus abdominis, which often gets neglected when doing other core exercises. There are several leg raise variations that can be performed depending on your skill level.
For example, you can do hanging knee raises, which are a bit easier than keeping your legs completely straight. Regardless of what variation you do, minimize swinging, control movement on the eccentric portion of the lift, and posteriorly tilt your pelvis for maximum core engagement. If you don’t rotate your hips backward, you’re primarily working your hip flexors, not your core.
Leg raises can be performed 1-3 times per week at any point during a workout. If strengthening and building your abs is a priority, do leg raises near the beginning of a training session. You can also make modifications, such as the twisting hanging leg raise, to target the oblique muscles more.
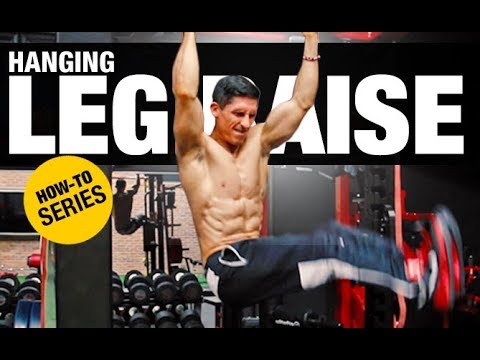
How to perform leg raises
- Grab onto a pull-up bar with a pronated grip that’s approximately shoulder-width apart.
- Allow your legs to hang straight down.
- Take a deep breath, then exhale as you raise your legs up while keeping a slight bend in your knees.
- At the top of the movement, focus on posteriorly tilting your pelvis by contracting your abs.
- Hold this position for a brief second, then slowly lower your legs back to the starting position.
- Repeat for the desired number of repetitions and sets.
In the video below, Athlean-X demonstrates how to perform a hanging leg raise properly!
Leg raise tips
- Avoid swinging your legs and using momentum to lift them up.
- Posteriorly tilt your pelvis at the top of each rep.
- If keeping your legs straight is too challenging, do hanging knee raises instead!
- To make this exercise more difficult, try the twisting hanging leg raise.
Cable Wood-Chop
When to perform a cable wood-chop
The last exercise on our list of best plank alternatives is the cable wood-chop. The cable wood-chop is ideal for those needing to strengthen their obliques because it trains the core via rotation.
Most of the exercises you perform inside and outside of the gym are in the sagittal plane (i.e., flexion and extension). Whereas in various sports, a lot of movements are performed in the transverse plane (i.e., baseball or golf swing). Training in the transverse plane is especially beneficial for any competitive athlete.
Not to mention, when a physique competitor has well-defined obliques, it can help them stand out amongst the competition. The cable wood-chop directly targets the obliques and provides constant tension. Regarding obliques, the cable wood-chop is one of the best exercises you can do. If you don’t have access to cables, you can do a Russian twist with a dumbbell or use a resistance band.
How to perform a cable wood-chop
- Position the cable pulley to hip height and attach a D-handle to it.
- Stand perpendicular to the cable pulley, reach across your body, and grab the handle with both hands by interlacing your fingers.
- Assume a wide stance with your feet facing forward.
- Take a deep breath, exhale as you pull the cable across your body, and twist your torso away from the cable pulley. Keep your arms extended throughout the movement.
- At the top of the rep, hold for 1-2 seconds and focus on contracting your oblique.
- Slowly rotate your torso and arms back to the starting position.
- Repeat for the desired number of repetitions and sets. Do the same amount of reps on the other side.
In the video below, Sal from Mind Pump TV walks you through the cable side wood chop to target your mid-section!
Cable wood-chop tips
- Keep a slight bend in your knees and hips as you perform the movement.
- If you have a muscular imbalance, start with your weaker side and perform the same amount of reps with the stronger side.
- Avoid pulling the cable with your arms; your torso should be moving the weight.
Reasons to choose a plank alternative
The plank is an incredible exercise for strengthening the core, but it’s not ideal for everyone. Since the plank doesn’t require any equipment, that wouldn’t be a reason why you would need to do a plank alternative.
However, if the plank is too easy or too difficult, you could look into doing something that’s more suitable for where you’re at. For example, you could start with a dead bug, then progress to doing a plank. On the other hand, if you need a more difficult exercise, an ab rollout or bird dog is a better option.
Another reason why you may want to do a plank alternative is that you want to target a specific core muscle, such as the obliques or rectus abdominis. Doing a cable wood-chop or cable crunch is a much more efficient way to train those muscles rather than doing a plank. Lastly, if you experience lower back pain or are recovering from an upper-body injury, planks may not be an option.
There are several reasons to choose a plank alternative, and fortunately, there are numerous core exercises that are great substitutes!
Muscles worked by the plank
The plank primarily targets the core muscles, including the rectus abdominis, transverse abdominis, and obliques. But it also engages several muscles in the lower and upper body, including the erectors, quadratus lumborum glutes, trapezoids, rhomboids, quads, calves, forearms, and lats.
Primary Muscles
- Rectus abdominis
- Transverse abdominis
- External obliques
- Internal obliques
Secondary Muscles
- Erectors
- Calves
- Quads
- Glutes
- Traps
- Lats
- Rhomboids
- Forearms
- Deltoids
- Quadratus lumborum
Frequently Asked Questions
What’s an easier version of the plank?
If a traditional plank is too challenging for you, try doing a knee plank by resting on your knees on the ground and keeping your arms straight. You can also try doing dead bugs instead since you’re still working the same muscles; however, your lower back is more supported.
Can you get abs without doing a plank?
There are no exercises that are required to get visible abs. In fact, if your body fat percentage is not low enough, then regardless of what ab exercises you do, you will not see your abs. With that said, having a strong core and building your abs is still very beneficial.
Plus, people with well-developed abs have a better chance of getting their abs to show even at a higher body fat percentage. There are several other exercises you can do to build your abs other than planks.
Do planks burn belly fat?
Unfortunately, there’s no magic exercise that melts away belly fat. Losing fat, regardless of where you store it, is a result of being in a caloric deficit for an extended period of time. Planks and other core exercises are still beneficial for building overall strength, injury prevention, and muscle.
Key Takeaways
Planks are a popular core exercise and for a good reason! They are an isometric exercise that works the entire body, especially the transverse abdominis. Strengthening your core is extremely beneficial, no matter who you are or what your goals are. But that doesn’t mean you have to do planks to strengthen and develop your core.
Planks are a great addition to your routine; however, performing other exercises, such as sit-ups, cable woodchops, and leg raises, is a good idea for overall core development. If you only do one core exercise, you are missing out.
Furthermore, if you cannot perform a plank for any reason, there are other exercises you can do that are very similar. Pick from any of the plank alternatives above, and you will get results if done correctly and consistently.
Other Alternative Exercises
If you enjoyed this post, check out our other roundups of the best alternatives for other exercises.